Sunday, June 23, 2019

Building a Budget Race Car Transmission: Used Differentials

Introduction

It was some time ago, in December of 2018, where I was in the middle of "off-season improvements" that I decided to build my own transmission.

Welding exhaust flanges in the winter

However, well-built, competitive Honda Challenge transmission builds can get expensive.  For example:

*Aftermarket final drive = ~$600
*MFactory metal plate differential = ~$900
*94-01 Integra "Brass Master" transmission rebuild kit from Syncrotech = ~$650
*New transmission gearset and case = ~$150-300 used (depends on seller/condition)

The above combination of parts doesn't consider the use of a better differential either, which can run upwards of $1500 (OS Giken).

OS Giken assembly

So, my goal was to assemble a competitive transmission setup for Honda Challenge H4 using as little resources as possible.  Similar to a lot of other parts on my car, I planned to hunt Facebook Marketplace, forums, eBay, and Craigslist for sales or deals on used parts for the build.

Custom eBay cold air intake, MSD coil bracket made from an oil pan, and an entire MSD setup I got for ~half-of-retail price

The first part of this series will cover selecting the differential.

What Does a Differential Do?

Whether in a front-wheel, rear-wheel, or all-wheel drive car, the differential takes power from the transmission's final drive and distributes it to the left and right axles.  

The simplest and most common differential is termed an "open" differential by car enthusiasts.

I'm not going to delve into specifics about this differential type.  The most important thing to remember about an open differential is that by design, the wheel with the least grip spins the fastest.  

This means, when going around a corner, you'll notice the car has a tendency to spin the inside wheel while the outside wheel isn't getting power.  Not only is this slow, but it's also lame.  In drag racing, this tends to result in one-wheel burnouts.


For specifics on an open differential, check out the video below:

LearnEngineering's video on open differential function

The next type of differential is called a "limited slip" differential (because it limits the slip of the wheel with the least grip).

There are two common types of limited slip differentials-- a torsen or gear-type differential and a metal plate or clutch-type differential.  

A torsen differential uses gears to limit slip and transmit power more evenly between the two axles.  Since I don't want to delve into specifics, I'll explain the pros and cons of a torsen:

Torsen pros:
*low-maintenance-- change fluid once a season for a road racing car
*easy to drive at low speed-- good for street driving
*typically cheaper than clutch-types

Torsen cons:
*Corner exit speed is not as high relative to a clutch type
Cannot adjust lockup percentage like in a clutch type
Cannot adjust lockup on decel or accel like in a clutch type

A torsen differential's function is described in the video below:

LearnEngineering's video on torsen differential function

A clutch differential uses clutch packs to transmit power from the transmission's final drive gear to both axles in an even manner which "limits slip."  A description of their function is shown below:


Torsen diffs are durable, relatively cheap, relatively fast, and great for daily driving since they don't provide a lot of low speed steering resistance.  So why would we want to run a clutch type diff?  Let's review the pros and cons below:

Clutch-type cons:
*Expensive fluid with friction modifier generally needed
*Requires fluid change after every weekend to avoid excess wear
*Can fail sooner than torsens if maintenance not kept up
*Expensive to purchase

Clutch-type pros:
*Generally faster than torsens  in a FWD car mid-corner to exit if set up correctly
*Adjustable for lockup on decel and accel
*Amount of lockup is adjustable

Seems like there are a lot of cons to running a clutch-type.  So why would we run it?  Well-- real-world experience and data suggest there's a benefit in lap time from the lowest Honda Challenge classes to the highest.  

For example, exiting corners, I sometimes have to wind my wheel out sooner and take a wider line to avoid cooking tires while competitors with clutch-type diffs can stay tighter, taking up less distance and thus less time.  Data reinforces this conclusion from the "butt dyno."

Watch corner exit speed in the in-car vs the silver hatch

Another example was when I drove the white DA Integra on the left and laid down a 0.7-second-faster lap time than in my car on my fourth lap ever in the DA.  Mid-corner and corner-exit grip were notably better due to the diff.  

NOTE: There were other variables in that case.  The car's final drive helped with corner exit speed at the track we were at.  The DA also had better, double-adjustable Konis in it than I had which made curbing a breeze to drive over.  And lastly the Integra was more stiffly sprung in the rear, which helped it rotate.

Brian's DA Integra and Damien's EK Hatch with an E30 in tow

What's the Diff?

I eventually found a Spoon Sports 1.5-way B16/B18B1 diff for ~$350 used.  Not knowing much about diffs and willing to take a risk, I drove down to Delaware, very close to where I lived at one time in my life, and I picked up this diff without asking many questions.

 
Diff with B18B1/B16 ring gear diameter

These diffs typically cost more than $1100 new on the internet.  I considered myself lucky at the time.

Making it all Work

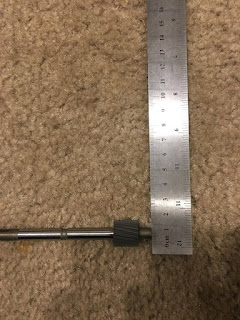
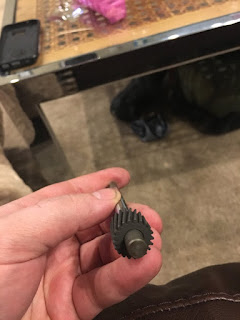
The first thing I noticed when I brought it home was that the ring gear where the vehicle speed sensor (VSS) goes was chewed up.  This was concerning:


This was likely caused by the previous owner not using the correct VSS gear.  Typically, when you buy a new diff, the diameter of the case is larger, so the manufacturer will include a different VSS gear to match up with the diff.  This is most common with:

*OS Giken
*Cusco
*Kaaz/Spoon

So, I began looking for VSS gears for a Spoon differential.  This part is hard to find as people don't typically sell it used and you usually have to buy it straight from the manufacturer.  However, since Kaaz makes the Spoon differential for the B Series tarnsmission, I was able order a new one for $150 shipped through their US sales department.

This brought total cost to $500...


Some pictures from my thread at Honda-Tech.com

Next, I opened up the differential and looked at the internals to see how bad the clutch packs were and if any of the gears were damaged.  Kaaz has a handy video that shows you how to disassemble their differentials shown below:

Differential assembly and disassembly

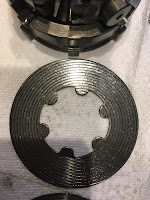
The plates had some of their clutch material worn off but none of them were missing teeth or extremely burned up.  Pictures of the plates are below:


All twelve clutch plates from the Spoon/Kaaz differential

The belleville washers were in rough shape.  Lots of scoring around the inner and outer diameter of the washer with a slight burr formed on the inner diameter of one of the belleville washers.  Additionally, the thrust washers were of different IDs and ODs and thicknesses.  In the pictures below, Thrust Washer B was thicker than A which suggests the previous owner tried altering initial lockup of the diff.

When I sent pictures of just these four pieces (NOT even the plates), Kaaz recommended a full rebuild kit-- about $250 dollars (wasn't gonna happen).  I requested the individual parts to no avail.  Kaaz would only sell all or nothing:


Thrust washers, belleville springs, side-by-side

To see how messed up my diff actually was, since Kaaz stated they "don't recommend patches," I began doing some research.

I spent a long time trolling the internet looking at the condition of others' diff plates, experiences they had with their Kaaz diffs, and reassembly and maintenance recommendations.  I read probably somewhere between 20 and 30 Honda-Tech.com threads, watched a bunch of YouTube videos, and stumbled across some less-known, but extremely helpful resources such as a blog called Pinderwagen.com.

Pinderwagen's tricked out Volkswagen

Pinderwagen was extremely useful in helping me determine that my clutch plates were probably in good condition.  I read their article on obtaining a used Kaaz unit similar to mine and saw the condition of their plates.  

After reading about their experience tracking the car with the plates in the as-found condition for a full season, I found out that their car performed very well.  I also saw that their data confirmed my understanding of speed from a plate-type vs. a torsen diff.  As a result, I decided to rebuild my diff as it sat-- also per directions on Pinderwagen and from other sources.

Pinderwagen's article on rebuilding a Kaaz diff

Rebuilding the diff is as follows:

1.) Clean the internals of the diff with solvent
2.) Lube all components with fresh differential fluid (I use Torco RTF per recommendation from other racers)

Torco RTF

3.) Reassemble the diff in order from either Pinderwagen's article or the Kaaz video on YouTube.


4.) Torque the allen bolts to spec for the diff

Assembled Kaaz diff on my dinner table with some Neshaminy Creek Brewing Company IIPA

Thanks for reading and see you guys here next time.

Tuesday, June 18, 2019

A Method to the Madness: Setting Tire Pressures for the Race Track

Introduction
It was about two to three years ago when a friend at the track asked me the question, “what tire pressures do you run” when I first dove into the world of car setup.  The conversation went something like:
Me: I run whatever, I just like to drive FAST
My friend: Okay, but have you ever considered that you could be faster?
Me: What do you mean?  I am fast. I drive flat out.  I don’t care about my tire pressures.  Did you see that FWD drift in turn 3? I’m fast.  I don’t need to set tire pressures.
Drifting at New Jersey Motorsports Park Lightning Course
My friend: …Okay, Go out this next session and when you come into hot pits stop up at the wall and I’ll take your hot pressures for you.
(The “Ricky Bobby Effect” is slightly exaggerated here)

Note: Hot pressure = tire pressure after a full-pace session on track
Cold pressure = tire pressure in paddock or while cold, before on track
I was having issues with lockup going into turn 1 at New Jersey Motorsports Park (NJMP) Thunderbolt.  I felt as though I had more brake in the car, but the tires didn’t want to stop.  The tires felt sluggish and unresponsive to my inputs.

Turn 1: NJMP Thunderbolt

After my friend took my hot pressures once I came back into pit lane, we looked up the optimal hot pressure for the Nitto NT-01s I was running on some forums.  Based on our research, we decided to add one PSI to the tire while hot.  Miraculously, my braking ability increased, my lockups deceased, and my times decreased.

A man checking cold pressures at New York Safety Track

As outlined above, knowing one's hot and cold tire pressures can make a seasoned driver faster given different ambient conditions, but it can also improve safety for a novice track driver.

Cold pressures are typically set with a target hot pressure in mind. Because air expands when hot, we set our cold pressures low and the air will expand after a hot session, at which point we can record our hot pressure.

The hot pressure is the pressure the tire works best at. While knowing your cold pressure is important, it's your HOT pressure that will tell you if you're extracting the most grip out of your tire's contact patch.
As an instructor with the National Auto Sport Association (NASA) it's common to encounter first-time students that don't know whether they torqued their wheels, let alone set their tire pressures correctly. I have heard stories of students going on track with 60 PSI cold or 10 PSI cold and coming back with horrified, but safe, instructors.
A scared instructor
However with the right approach, you can be both fast and safe. For both approaches covered below, the assumed tools at disposal are:
1.) Car
2.) Race track
3.) A pen and paper
4.) Tire data (Google)
5.) A REPEATABLE tire pressure gauge
6.) A friend to help (optional)
Alex, TJ, and I going over tire temperature data at Watkins Glen

The First Approach (Easy but Less Optimal):
Anecdotally, tire pressure gauges are most accurate in the middle of their range. So for track days in a regular car, a 0-60 PSI gauge should do fine. This statement applies because for a street car, your hot pressures should be between 30 and 40 PSI on average.
You can purchase a tire pressure gauge from Joe's Racing, a reputable brand, on Amazon for a little over $20.

Joe's Racing tire pressure gauge

After obtaining your tire pressure gauge and going to the track, write down the ambient conditions on your paper with your pen. This should be done before each session. You should ask:

1.) Is it cloudy?
2.) Is it raining? How heavy if so? If heavy, a lot of this article isn't applicable, so stop reading now.
3.) What is the humidity level?
4.) What is the ambient temperature?
5.) What are your cold tire pressures?
Next, go to Google and search the interwebs for what people with your tires on similar cars like to set their hot pressures at for the track. It's important to get multiple opinions to get rid of the incorrect data, or noise, from your observations. Forums, Facebook, hobbyist websites, and manufacturer websites are some sources you can mull through.

Note: You can also just TALK TO PEOPLE at the track!
A review of the NT01 from Race & Track Driving

Once you know a base for your starting hot pressure, write that down, set your tire pressures at a reasonable cold pressure, and head on track. For most Civics, Integras, Miatas, and E30s with 15-inch tires, at most ambient conditions, I find 30 PSI cold to be a reasonable starting pressure.

Note: Your cold pressure must be lower than your target hot pressure. Air EXPANDS when hot!

Next, drive the car. Go out for a full session on the tires. If the car feels funny at all, try to drive around the car's character. If the car feels unsafe, bring it in. Not only will driving around your car's imperfections improve car control and driving skill, but it will allow us to reach our final goals which are:

1.) Observe what your tires feel like (very important)

2.) Get enough heat in your tires to get an accurate hot pressure (also very important)

Lawnmower life

If you've observed what your tires feel like, you should know to a certain degree what your car feels like under braking and turning. We will now use the following table to determine whether your car's tires are under-inflated, over-inflated, or just right:


Figure showing car "feel" relative to tire pressure

If, per the table, your car's tires feel under-inflated or over-inflated, adjust the pressures as necessary.  Repeat the steps of adjusting tire pressure and driving the car as necessary until you find a happy spot.

For a front-wheel drive car, when a hot pressure works well for the front of the car, I've found that the same hot pressure should be set at the rear of the car.  However, I'm close to certain that this is the right approached based on feel, but also based on data, which we will now cover in...

The Second Approach (Hard but Betterer)

For the second approach, we need one additional tool, which is:

1.) A tire pyrometer

A tire pyrometer uses a probe, inserted into the tire's tread, to measure the temperature of the tire's rubber.

Taking a reading of tire temperature (photo from Turnology)

The temperature of your tire's rubber is probably the most important measurement you can have for your tire, after your hot pressure.  This is because not only does tire temperature tell us about whether our pressures are set right, but it also tells us things like:

1.) Where the majority of the weight lies (front or rear of the car)

2.) How the spring rates or sway bars we've chosen affect tire loading

3.) Are our camber settings correct for this track?

A tire pyrometer

Some will use infrared (IR) temperature guns to read tire temperature when the car has pulled into pit lane, but this is not as accurate.

IR Temperature gun reading engine bay temperature

Part of why infrared guns are not useful for measuring tire temperature once the car has stopped and is in hot pit lane is because they only measure the temperature of the surface of the tire.  Tires cool extremely fast after a hot lap.  As a result, the surface temperature will not be representative of the tire's actual temperature at pace.

Additionally, user and machine error (distance from measuring target and surrounding brightness) can also affect the measurement.

Tire pyrometers can be found used on eBay for ~$50 if you wait for a good deal to pop up.  Mine was purchased two years ago (2017) for $50 in used condition.  It sits in the glove box of my Civic during practice sessions.  My friend Alex's was purchased this year (2019) for $60 with a carrying case.  He will be using this at upcoming events.

Alex (owner of TrashTeg) and Brian going head to head in their Honda Challenge H4 cars.

In the second approach, we do most of the same as the first, initially.

1.) Record ambient conditions

2.) Find optimal hot pressure for tire and car

3.) Set cold pressures as described above

4.) Finally, go drive the car-- observing how the car feels

Where the second approach differs starts with when we pull the car off track.  In the first approach, we may wait until the checkered flag is thrown.  After this, we may have a cooldown lap and bring the car in to record our tire pressures.  However, remember that I said that tires cool extremely fast.

So, we pull the car in a lap or two early after running it at full pace.  We come to a full stop in hot pits, and we have a friend immediately record tire temperatures-- or we do this ourselves.  If you're going to do this yourself, put your pyrometer and tire pressure gauge in your glovebox.

Recording tire pressure at Watkins Glen in a racing suit

There are three tire temperature measurements to record for each tire-- a total of 12 measurements.  We want:

1.) Inner tire temperature
2.) Middle tire temperature
3.) Outer tire temperature

I typically record my tire temperatures first, in order of driver front tire, passenger front, driver rear, and passenger rear for a clockwise rotation track.  Then, since tire pressure decreases less rapidly with time, I record tire pressures second.

There are printouts available online that make the recording process easier.  Or, you can make your own printout.  Digesting the data from a printout is much easier than a bunch of scribbles in a beat up book (which is what I do).

Photo taken from Quickcar Racing Products

As mentioned above, tire temperatures can tell you a lot about the car beyond what your pressures should be.  This is why I prefer this method.  I'll briefly go over what temperature can tell us for camber and chassis loading and get back to specifics about hot tire pressures.

Every tire has an optimal average temperature.

Average temperature should be close to that optimal temperature and is mainly driven by weight-to-tire-width ratio, spring rate, and other variables.

Camber and other alignment/chassis setup factors can affect tire temperature distribution from the outside to the inside.  Generally we want a 10-15 deg. F. distribution from inside to outside with the inside hotter than the outside.  This tells us that the camber is adequately negative for a given track and chassis setup condition.

Setting camber with a plumb bob, a stick, and some stuff and things.  Pic from LexiLaron.

However, for the sake of this article, we're looking for two things:

1.) The middle of the tire is not hotter than the outside and inside

2.) The middle of the tire is not colder than the outside and inside

Insert Civic picture here

We want to set the hot tire pressure so that the middle lies in between the outer and inner temperature.  The procedure for adjusting hot tire pressure based on a pyrometer reading is as follows:

1.) If the middle temperature is higher than inner and outer temps, the hot pressure is too high-- lower it by 1 PSI

2.) If the middle temperature is lower than inner and outer temps, the hot pressure is too low-- raise it by 1 PSI

Continue adjusting tire pressure per the procedure above until the middle temperature is in between the outer and inner tire temperatures.

Once the tire temperature distribution is satisfactory per the above requirements, we employ the feel technique which we covered in the first method.  Based off of experience with a car of the following specs, I find a range of ~5-6 PSI where I can adjust hot pressures to influence car feel:

2500 lbs Civic
B18B1 Engine (stock)
Integra brakes
Toyo RR 15/50 R205 tires

Once the car feels good, feel free to rip.  Take the data from your notes home, read up on suspension setup, make tweaks, and be faster than before (hopefully).

Peace

Thanks for reading all!  Have fun racing and driving.

Tuesday, April 30, 2019

#TrashTeg, The Chronicles; Part 3-- DIY Racecar Seat Back Brace

When we last left off regarding #TrashTeg, we discussed safety upgrades before an HPDE event.  In this blog post, we're going to narrow the scope a bit and talk about some specifics-- specifically regarding the seats.


Recall that the seats we used in this budget, to-be, Honda Challenge H4 race car, were found on Craigslist for an extremely cheap price due to their condition and age.  We paid ~$150 picked up ~30 minutes from home.


While the condition of the seats won't win any car shows, we don't care because we're racing the car.  However because the seats are old, their FIA certification has expired.

When doing HPDE or track days with the National Auto Sport Association (NASA) or other clubs, this may be okay as long as the car passes other safety rules.  However, wheel-to-wheel racing is a different story.  If the FIA certification is expired, the seat must be reinforced to ensure the seat back doesn't snap on impact.  To solve this problem, enter the back brace.


A seat back brace is intended to prevent excess movement of the seat forward or backward in a crash.  This ensures that the driver stays in the same spot, the harnesses do their job, and the driver is unharmed due to whiplash or other injury caused by sudden, harsh movement.  To read more about seat back braces and why they're useful, see this article by IO Port Racing.


Since our Integra was being converted from an HPDE car with a roll bar to a race car, one thing (among many) we needed to add was this seat back brace.  

The IO Port back brace is what we used, not because we're sponsored by them (I wish), but just because it's what we happened to order from them.  The kit comes with everything you'll need.  The picture below shows the contents of the kit and what purpose the components serve:


To begin installing our new brace, we first stripped the pristine fabric off of our God-knows-how-old years-old seats.


Lifting back the foam, it was easy to see where we could drill into for our new brace.


Next we began bolting things together.  In the labeled picture of the seat back brace above, you'll notice that the tube that transfers load from the seat to the cage in the event of a crash is secured to the cage with a two-piece, machined block of metal.  The top half of this block bolts to the cage and the bottom half bolts to the tube that transfers load.

We loosely bolted this onto the cage first.


Next, we grabbed our load transfer tube shown below:


And we inserted it into the bottom part of the machined block which we had loosely attached to the cage.  After doing this, we tried our best to center the bracket on the middle of the seat.

You'll notice that seat-back bracket was flat but the seat was curved.


To remedy this we needed to intervene, bending the soft aluminum with a vise and a hammer.  While in the vise, we also drilled the holes for the seat-to-bracket mounting hardware.  

Note that in the NASA Club Codes and Regulations (CCR), the mounting hardware facing the back of the car's driver must be flush with the seat, not protruding.  IO Port includes allen bolts which preclude any potential conflict with this rule and also provide for additional safety.


With the bracket bent to the profile of the seat, we centered the bracket with a whiteout marker and marked where the seat needed to be drilled.


Then, we secured the bracket to the seat using the provided hardware from IO Port.  On the side of the seat facing the racer's back, we used allen bolts with rounded heads as previously mentioned.  On the side opposite the racer's back, IO Port provided us locking nuts to use.


With the seat back brace secured to the seat and all other components loose, we finally began securing all other components which would bring us near completion.

The diagram below shows the order of final installation.  First, tighten the back brace-to-load transfer tube bolts.  Second, tighten the allen bolts securing the main block to the cage.  Third, drill a hole in the load transfer tube and insert your cotter pin:


With the back brace fully installed, we finally put the fabric back on our seat and concluded our install.  The fabric is easy to install back onto the old Corbeaus.  It has an elastic band that allows the fabric to stretch around the contours of the seat and tighten once past the edges.


Detailed photos of the installation are shown below:


On May 3rd, my friend Alex is going to New Jersey Motorsports Park with NASA Northeast to participate in Competition School for his provisional license and hopefully begin racing with the Honda Challenge H4 crew.

Image may contain: car

If you wish to attend one of our events, reach out to me in the comments section and I can get back to you ASAP!

Thanks for reading! --Track Rat