
EJ2
Track Rat: B Series Axles
If
you road race or do HPDE with a Honda that has a B Series motor such
as a B18B1, B18C5, B16A2, etc, then you’ve likely run into axle
problems.

Figure
1: Integra Axle with Torn Outer CV Boot
Many
cars with continuous velocity (CV) axles, even street cars, encounter
torn boots every once in a while. But when you throw in hard braking
from 100 MPH to 60 MPH once every minute-and-a-half, or when you
subject your CV joints to excessive stress with a lowered car, or
when you toss R comps and excessive lateral loads at your vehicle,
you’ll quickly find the limits of physics.

Figure
2: Damien’s Dirt-Nasty Low “EK” Hatch Race Car
Excessive
heat from rotors, loads from cornering, and aggressive articulation
angles all result from the conditions mentioned above. With the
added heat and stress, the components inside of the CV joint
typically wear in an accelerated manner-- and for those who are
racing, that could mean a DNF or last place. Either way you’re
losing points toward your championship and wasting money with a
broken car on track.
This
writeup provides a solution for those of you who hate your axles. Do
you want to drive on R comps? Do you want to be dirt-nasty low? Do
you want to crack rotors with heavy braking? Well, you’ve come to
the right place.

Figure
3: The Chaos That is Racing
Problem
1: Grease
The first problem associated with many parts-store brand axles that
are made for B-Series-equipped Hondas is that they likely don’t
have enough grease in them. Even if they do have enough grease, one
has to question how high quality said grease is. When a single CV
axle costs $35, do you trust it to hold up to the stresses of racing
or track days?

Figure 4: These SurTrack Automotive Axles are Cheap at ~$35 from
RockAuto
We solve this problem by replacing the old, crappy grease originally
present in your axles with high-quality grease. For this DIY, I
chose to use Redline CV-2.

Figure 5: Redline CV-2 “High Moly Content” Grease
Redline CV-2 is the grease of choice for rebuilding these troublesome
Honda B-Series axles as it is made by a reputable company, withstands
temperatures up to 500 degrees Fahrenheit, high pressures, which are
common in CV axles, and because it contains an “organic moly” as
stated by Redline. This organic moly is likely a compound referred
to as molybdenum disulfide. Due to its molecular structure, it
provides superior lubrication like graphite but it also adheres to
metal surfaces very well.

Figure 6: My Friend Alex Lubing up an Axle with Redline CV-2
Problem
2: The Heat
As
I mentioned at the beginning of this writeup, the axles are subject
to a lot of stress on a FWD race car. Heat is transferred from hot
rotors to the axle spindle through the hub and heat is generated by
the bearings in the CV joints as they rotate and articulate. The
effects of this heat can be exacerbated by other factors mentioned in
this article such as poor grease and poor manufacturing tolerances in
cheaply made axles.
If the grease can’t handle the heat, its lubricating properties
degrade, subjecting the bearings in the CV joints to excess
friction-- compounding the problem. If the ball bearings are pitted,
the bearing races are cracked, or the cages are cracked, the axle may
begin to vibrate and eventually fail catastrophically.
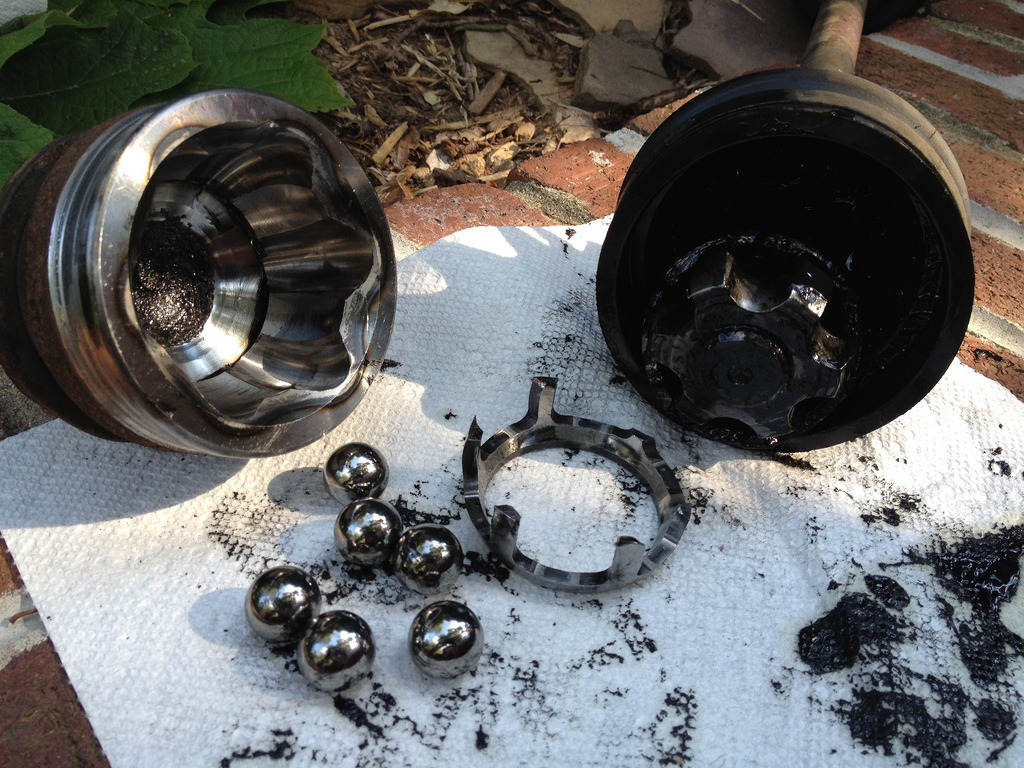
Figure 7: Cracked Cage on a Subaru CV Joint
To solve this problem, we firstly use better quality grease.
However, we can also vent the CV joints.
Venting
CV joints has not been empirically tested to the best of my
knowledge-- however,
it is a practice that has been employed in the Honda road racing
community for a long time by reputable axle manufacturers such as
Gator, RAxles, Insane Shafts, and Driveshaft Shop. While the
efficacy can be debated for days, it still doesn’t hurt to
understand the theory and
construction of axle vents.

Figure
8: Venting the Outer Boot of an Acura Integra Axle
When the axle is rotating at a high speed, it is believed that the
centrifugal force generated by this behavior disperses any excess
grease around the inner diameter of the axle boot. This, in theory,
creates an air space in the center of the CV joint. Heat from the
hot, rotating CV joint is transferred to the air space, and if the
air is not vented, it is believed that this can accelerate axle wear.

Figure 9: Diagram Showing Air Pocket at Center of CV Boot
To evacuate this hot air, it is believed that a small “vent”
(which is actually a tube inserted between the boot and axle shaft)
can be used.

Figure 10: Diagram Showing Added “Small Tube” Which Serves as a
Vent
Problem
3: Manufacturing
I’ve taken apart brand new parts store axles that have failed on my
race car and discovered that they were adequately greased, but failed
anyway. This, and other anecdotal evidence I’ve read online and
heard about from other B Series drivers leads me to believe that
“they just don’t make ‘em like they used to.”
This last section isn’t me saying that a parts store axle with high
quality grease can’t last. Contrarily, I have seen and heard of
people regreasing parts store axles with high quality grease and
having great success at a reduced cost. However there is a generally
true inverse relationship between quality and cost with auto parts
that suggests machining tolerances and material quality may be
compromised for the sake of pricing-- especially with economy-priced
axles.
So, let’s not focus on how true the above statements are. Let’s
just make sure that our axles are well made. The easiest way to do
this is with visual inspection and with precision measurement tools.

Figure 11: A Starrett 0-1” Micrometer I Bought for $10 on OfferUp
When
disassembling your axles to regrease and vent, measure any components
you can and visually inspect the friction surfaces. Visual
inspection should always be implemented as it is cheap and easy if
you know what to look for. If you don’t have precision measurement
tools, it’s not the end of the world, but they do help.
Starting
with the outer joint of an
Acura Integra CV axle, it
consists of six ball
bearings, an inner race, a cage, and
an outer race which is integrated into the spindle.
This type of CV joint is
called a “Birfield joint.”
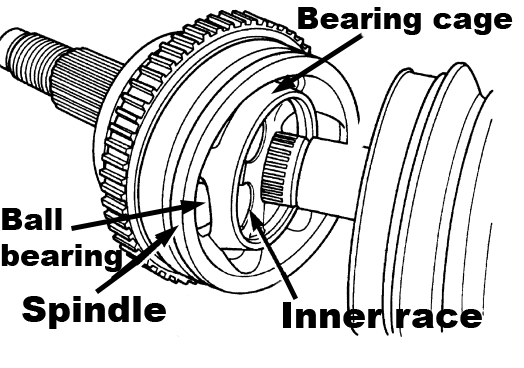
Figure
12: Diagram of Outer CV Joint
Disassemble
the outer joint and begin visually inspecting the components. The
following video is a great DIY on how to disassemble the outboard
joint of a CV axle: https://www.youtube.com/watch?v=3-R11jtnyV8.
Things to look for during
inspection include: metal
pitting, hairline fractures and cracks, and discoloration.
Figure
13: Discoloration on the Spindle Caused by Overheating
If
you can see pitting on the metal surfaces, it could be due to
contaminants in the grease such as sand that entered through a torn
boot or corrosion from moisture. If you see discoloration, it is
likely that grease was not lubricating effectively
in the affected
area and the metal is now distorted. If you see cracking, the
affected area may have overheated at some point or may have been
constructed from cheap metal.

Figure
14: Ball Bearings with Spalling
A
well-manufactured CV axle, such as an OEM unit, will show minimal
signs of wear on the friction surfaces. I
have disassembled OEM Acura Integra Axles with over 150,000 miles on
them and torn boots with nearly perfect looking wear surfaces.

Figure 15: Outer Races of Said 150,000 Mile Axle with Minimal Wear
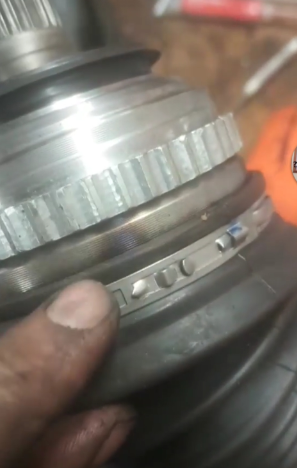
Once you’re finished your visual inspection, measure whatever you
can with precision measurement tools. Engine builders use this
process when disassembling motors. Critical dimensions are measured
to the nearest one-thousandth, sometimes the nearest ten or
one-hundred-thousandth of an inch to gauge the health of various
components. If the components are found out of spec, they are sent
to a machine shop where they can be brought back into spec with
specialized machinery.

Figure 16: Using an Outer Diameter Micrometer to Measure Ball Bearing
Diameter
For the outboard joint of a CV axle, one easy component to
“blueprint” is a ball bearing. Take several diameter
measurements of the ball bearings and compare the results against all
bearings in the axle set. Mark each ball bearing with dots so that
outliers can be identified. Record your results for future rebuilds.
My OEM axles that I rebuilt all had healthy looking ball bearings
with outer diameters that were the same to one-thousandth of an inch.

Figure 17: Recording Ball Bearing Diameter Results
The process is the same for the inboard CV Joint. Disassemble,
clean, visually inspect, and blueprint what you can. The inboard CV
joint used on B Series Hondas and Acuras is known as a “Tripod
joint.” The picture below shows a cutaway view of the side of the
inboard joint on the left, and on the right, a cutaway view of the
front.

Figure 18: Tripod Type CV Joint (Image from:
http://what-when-how.com/automobile/universal-joints-automobile/)
Below you’ll see the inboard spindle that houses the majority of
components comprising the inboard joint assembly. Again, this is an
OEM unit and looks nearly immaculate after years of abuse.

Figure 19: OEM Honda Tripod Joint Housing (“Cylindrical Pot
Chamber”)
When I disassembled the inboard joints, I only blueprinted the outer
diameter of the “semispherical rollers” as outlined in Figure 18.
But I could have also disassembled these “rollers” and
blueprinted their internals as well.

Figure 20: Semispherical Rollers Cleaned and Recently Inspected
Again, when blueprinting the inboard side, the more measurements you
can take the better-- but remember, all of the measurements are
relative (unless you’re an engineer at Honda and have access to the
dimensions you need!) Regardless of what the measurements are,
record them and keep them for future axle rebuilds. More data is
always better.
The
Finished Product
Disassembling,
cleaning, inspecting, greasing, venting, and rebuilding your old
axles can be a hassle, but if you’re looking to save a buck, the
tips in this writeup should help. When you buy a project car, save
the OEM axles! When your friend wants to throw out their OEM axles,
save the OEM axles! And if you’re at a junkyard and you see OEM
axles, save the OEM axles!
#SaveTheOEMAxles

Figure
21: An Assembled, Regreased, Vented, and Blueprinted OEM Honda Axle
Thanks
for reading all. Your time is greatly appreciated.

Figure
22: Chelsea the Civic
Helpful
Links
CV
Joint Types:
http://what-when-how.com/automobile/universal-joints-automobile/
How
to Disassemble a Birfield Joint:
https://www.youtube.com/watch?v=3-R11jtnyV8
How
to Replace CV Boot:
https://www.youtube.com/watch?v=-S-ofMoWsr0&t=329s
Band
Tool Operation: https://www.youtube.com/watch?v=mBsqyH6xhw0
How Does Moly Grease Work: http://www.nitronine.com/how-does-moly-grease-work/


